Best 4 AI Workflow Tools for Developers in 2025
Amit Eyal Govrin

TL;DR
- Around three quarters of developers already use or plan to use AI tools in their workflows. Community threads on Reddit and other forums reflect both enthusiasm and skepticism, showing the need for practical comparisons of AI workflow platforms.
- AI workflow tools address gaps left by manual scripts and rigid automation like deployment scripts that run but fail to configure monitoring or handle errors reliably. They parse unstructured inputs, enrich alerts, and adapt dynamically, reducing repetitive decisions and silent failures in pipelines.
- Selection criteria for teams include developer usability (APIs, IaC, versioning), integration breadth (SaaS, Kubernetes, Terraform), and scalability with governance (RBAC, audit trails, secret management). These factors matter more than flashy features.
- Kubiya distinguishes itself by bringing deterministic, context-aware AI agent orchestration to DevOps workflows; combining secure role-based permissions, full auditability, and seamless integration with infrastructure tools, though it demands investment in configuring governance, context, and environments.
- Zapier, n8n, and Make target broader audiences: Zapier dominates for non-technical teams with 8k+ integrations but grows costly at scale; n8n offers developer control, self-hosting, and extensibility; Make provides a strong visual-first builder with advanced branching for complex data transformations.
- Best practices include starting small with high-impact automations, enabling observability for failure detection, and prioritizing security with secret management. In 2025, industry reports suggest that nearly half of organizations have already adopted AI orchestration to operationalize automation platforms, signaling a shift from static trigger-action workflows toward adaptive orchestration where AI handles error recovery, enrichment, and routing
Introduction
Developers are already folding AI into everyday workflows; a large developer survey shows that roughly three quarters of respondents reported they are using or planning to use AI tools as part of their development process, which frames why comparing workflow tooling is timely for engineering teams.
At the same time, community conversations reflect both enthusiasm and skepticism about where AI belongs in the toolchain; for example, threads reacting to recent developer surveys show lively debate about trust, accuracy, and where automation should sit in a pipeline, useful context when choosing an automation platform.
This piece is for developers who actually write code, push features, and deal with delivery every day. Think of the folks already using tools like Cursor, Copilot, or custom scripts to speed things up. We’ll cut past the marketing fluff and focus on the real concerns; API-first design, deployability, observability, and security. The flow is simple: define the selection criteria, walk through each tool, line them up in a comparison table, and end with clear takeaways on which option fits which kind of team.
Why AI Workflow Tools Are Needed
AI workflow tools are platforms that let developers define, run, and manage sequences of automated tasks, but with added intelligence. Unlike AI code generation, which produces snippets or entire programs from a prompt, workflow tools focus on connecting multiple systems and processes together in a reliable, observable way. In other words, AI code generation helps you write code faster, while AI workflow tools help you run operations automatically across different services, often interpreting messy data and making adaptive decisions along the way.
The latest software delivery rarely happens in isolation. A single feature release often spans issue tracking, code review, Continuous Integration (CI), deployment pipelines, monitoring, and cost analysis. Without a structured workflow, developers end up stitching these steps together manually through scripts, ad hoc API calls, or brittle glue code. This approach introduces silent failure points, for example, a deployment might succeed but monitoring alerts could remain unconfigured because no one remembered to wire that step. Over time, these gaps accumulate into operational risk.
AI workflow tools address this by introducing orchestration with context. Traditional automation platforms like shell scripts or basic schedulers can execute tasks, but they lack the ability to interpret unstructured inputs or adapt to unexpected states. An AI workflow tool can, for instance, parse logs for anomalies, enrich alerts with contextual data, or dynamically route a failed build to the right remediation workflow. This is not about replacing developer judgement but about eliminating repetitive decisions that drain time and attention.
The growing complexity of software ecosystems also raises the need for interoperability. Teams routinely work across multiple Software-as-a-Service (SaaS) products, cloud providers, and internal services. Without a unifying workflow layer, each integration must be maintained separately, often duplicating authentication and data handling logic. AI workflow tools standardize this integration surface, allowing developers to define flows declaratively while letting the platform handle retries, error propagation, and scaling. In practice, this means a new service can be plugged into an existing pipeline with far less overhead, reducing friction while preserving reliability.
Selection Criteria
Choosing an AI workflow tool is not just about flashy integrations; developers evaluating these platforms typically balance reliability, extensibility, and operational overhead. To make the comparison meaningful, we will frame the tools against a consistent set of criteria that reflect hands-on engineering concerns.
1. Developer Usability
The first consideration is whether a tool supports developer-first workflows. For many teams, this means a clean Application Programming Interface (API), Software Development Kit (SDK) support, and the ability to treat workflows as code under version control. While visual builders and no-code interfaces are useful, mid-to-senior developers often prefer Infrastructure-as-Code (IaC)-style definitions that fit naturally into their Git workflows and Continuous Integration (CI) pipelines. Ease of debugging, local testing, and clear logs also fall under this category.
2. Integration Surface
Workflow tools live or die by the breadth and reliability of their integrations. A platform that supports thousands of SaaS connectors may still fall short if it cannot handle authentication securely or lacks enterprise-focused services like Kubernetes, Terraform, or monitoring platforms. When assessing integrations, it is important to look at both the quantity of prebuilt connectors and the ability to define custom ones. For example, an extensible Node.js or Python SDK gives developers a path to bridge gaps without waiting for vendor updates.
3. Scalability and Governance
Finally, the right tool must scale with team size and system complexity. A workflow that runs once a day for a single developer has very different requirements from an automation that coordinates deployments across clusters. Scalability encompasses horizontal execution, concurrency limits, and resilience under load. Governance is equally important: role-based access, audit trails, and secret management determine whether a platform can be trusted in production. Without these guardrails, even the most capable workflow engine becomes an operational liability.
Top 4 AI Workflow Tools
AI workflow tools are becoming extremely important for teams managing complex pipelines, from code delivery to business automation. The four platforms below stand out for their ability to blend automation with intelligence, helping developers reduce repetitive tasks and improve reliability.
1. Kubiya (AI Agent Orchestration for DevOps)
Overview
Kubiya is designed for infrastructure and DevOps teams that want to embed AI-driven workflows directly into their delivery pipelines. Instead of relying on static triggers, Kubiya introduces an agent-based orchestration model where autonomous agents handle provisioning, governance, and remediation tasks. This makes it a strong fit for environments running Kubernetes, Terraform, and Continuous Integration/Continuous Deployment (CI/CD) systems.
Key Features
- Agent-based orchestration for cloud and DevOps workflows: Kubiya agents can execute tasks such as Terraform plan/apply, Kubernetes job invocations, or CLI/API commands in secure runners. It supports multiple execution environments (e.g. Docker containers, remote runners via SSH, or Kubernetes job invokers) which lets workflows run in isolated, scoped contexts, avoiding leaking credentials or unintended side effects.
- Integrations with Kubernetes, Terraform, and CI/CD pipelines: There is a clearly documented Terraform provider for managing Kubiya’s own resources (agents, integrations, workflows) via Terraform configuration. Kubiya also connects directly to tools such as Kubernetes (managing deployments, scaling etc.), Terraform, GitHub, GitHub Actions, and monitoring tools. These integrations are often bidirectional, letting you trigger workflows or agents from external events (e.g. CI failures, repo changes) and perform operations in infrastructure.
- Compliance enforcement with policies-as-code and governance: Kubiya includes a policy engine that enforces role-based access control (RBAC), rate limits, token budgets, and approval workflows for operations deemed “high risk.” This allows enterprises to embed guardrails so that, for example, only certain users or roles can apply changes to production, or only after specific approvals. Secret management is scoped and integrates with external secret stores. Audit trails are detailed, logging agent actions, prompt content, execution outputs, and metadata such as who triggered it.
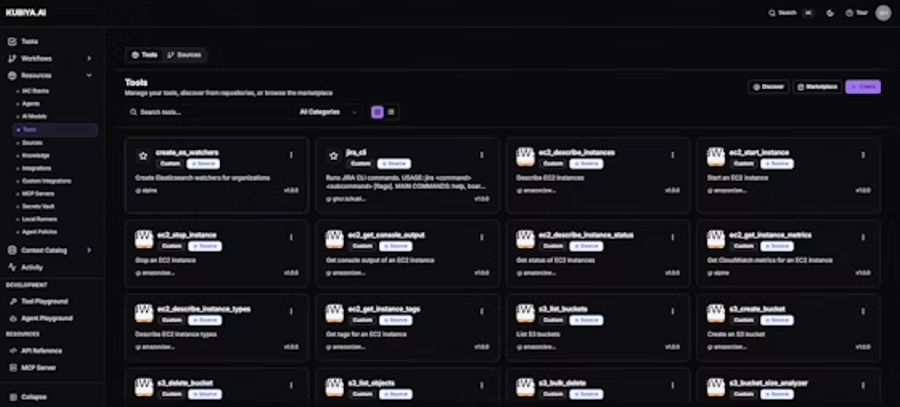
- Self-service developer workflows through natural language or SDKs / conversational interfaces: Engineers can create or invoke workflows via conversational channels (Slack, Teams), web editors, or via Kubiya’s SDKs. There is an “ADK Provider” (Agent Development Kit) that supports generating workflows from natural language descriptions (“compose”) in “plan” or “act” modes, performing validation, streaming progress, etc. This lowers the barrier for non-workflow authors to define new automations safely.
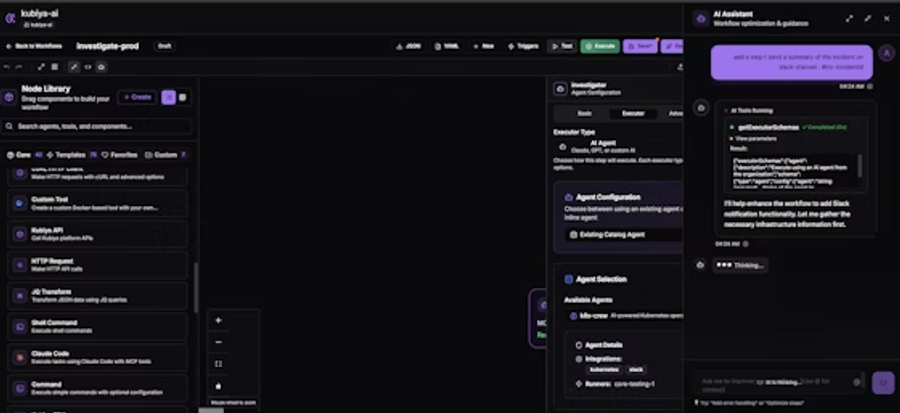
Hands-on Example
You will use Kubiya’s Web Composer to author, run, and save a simple automation end-to-end in the browser. The workflow will be created from a natural language prompt, executed with live logs and a visual timeline, and then saved as a reusable workflow that can be invoked manually, scheduled, or called from chat. This is a focused, practical run-through of the five-minute quickstart.
Prerequisites
- A Kubiya account and access to the Web Composer at compose.kubiya.ai. First-time users get a hosted runner and sample integrations to try without installation.
- A browser and network access to the Kubiya Composer UI.
- Optional but recommended: Slack or Teams workspace to test ChatOps triggers, and any API keys for integrations you expect to use (these are added later in the integrations panel).
Step 1: Access the platform
Open your browser and navigate to compose.kubiya.ai.
Sign in with your preferred method. If you are a new user, follow the signup flow; you will have immediate access to a demo environment with a hosted runner and sample integrations.
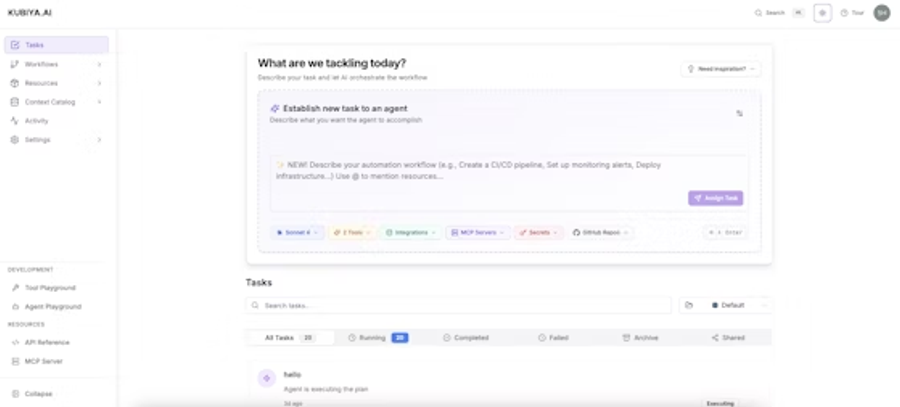
On first login you should see the Composer main interface, which contains workspace navigation, the New Task entry point, and a list of sample tasks and workflows.
Step 2: Create your first task from natural language
Click New Task to open the AI chat interface. This is the entry point for describing automations in natural language.
Try a starter prompt from the UI or type your own. Example prompts the Composer surfaces include: Infrastructure Health, Application Deployment, and Incident Response.
Example prompt to use: Check the health of my Kubernetes cluster and send a summary to the #devops Slack channel
As you type, Kubiya’s AI begins to interpret intent; you will see suggestions for model selection or additional clarifying questions if needed.
Step 3: Review AI-generated workflow and context
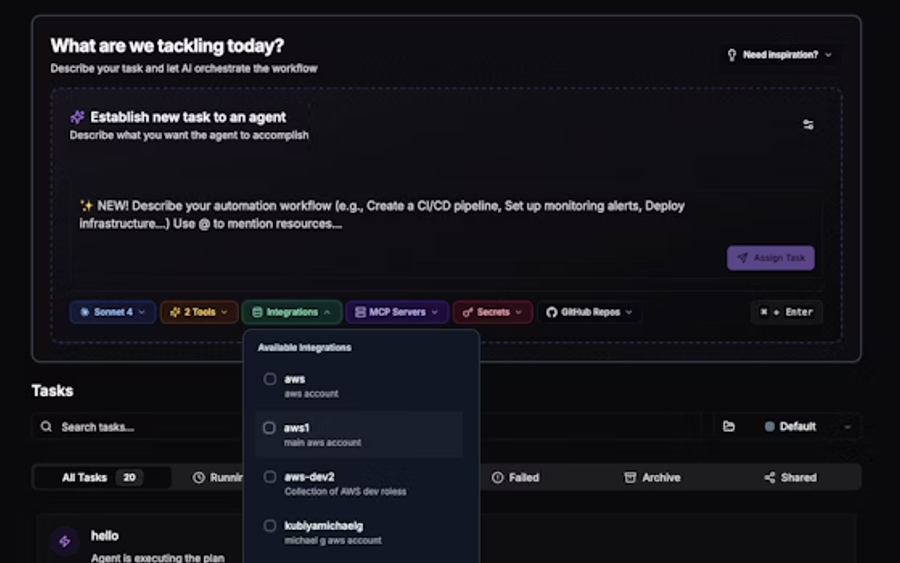
Kubiya will generate a structured workflow based on your prompt. Inspect the generated plan in three areas the Composer shows:
- Available Integrations: the tools the workflow intends to use (for example, Kubernetes, Slack, GitHub).
- Context Discovery: information Kubiya discovered about your environment that it will use to shape the workflow.
- Workflow Generation: the step-by-step automation plan, including executors and expected outputs.
Review the proposed steps and integrations; adjust or remove any step that is not applicable. This is the time to verify the scope and blast radius of the automation.
If the workflow needs a credential or integration you do not yet have, note it and add it via the integrations panel before running.
Step 4: Execute and monitor the task
Click Run to execute the workflow in the hosted runner. The Composer displays live execution progress.
During execution observe three real-time artifacts the Composer provides:
- Real-time Progress: streaming status for every step so you know which step is running now.
- Execution Logs: detailed stdout/stderr and any step outputs for debugging.
- Visual Timeline: a timeline view that shows completed, running, and pending steps for quick navigation.
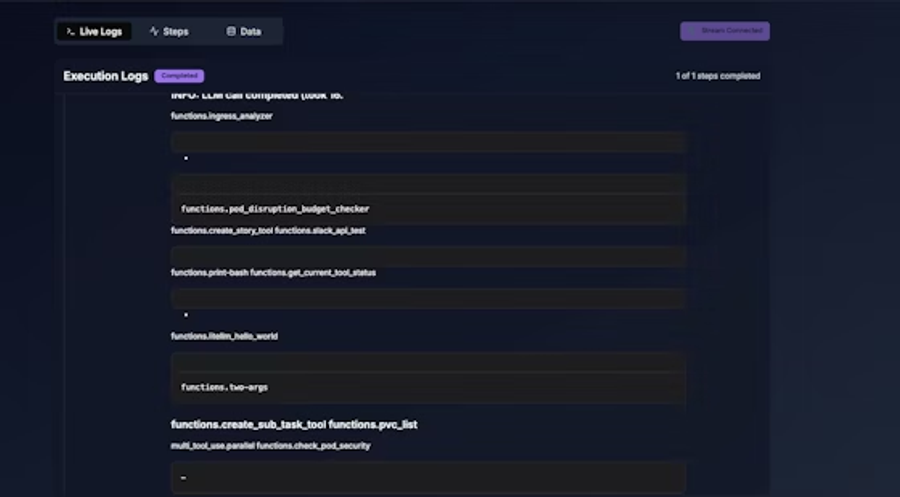
Use logs to confirm successful actions or to identify failures; the UI permits expanding any step to see full logs and artifacts.
Step 5: Save and reuse the workflow
If the task ran successfully and you want reusable automation, click the workflow publisher dialog and choose Save as workflow.
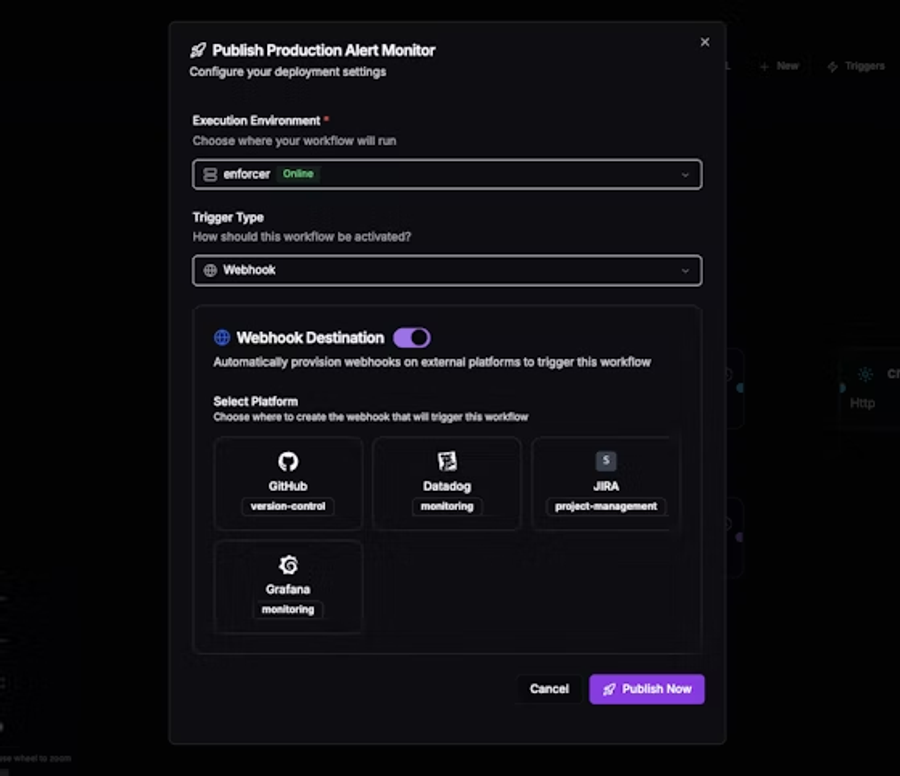
Save options typically include a name, description, and tags for discoverability. Document the expected inputs and any required integrations.
Your saved workflow can be invoked in multiple ways:
- Manually by team members from the Composer.
- Scheduled to run on a cron or calendar schedule.
- Triggered via webhooks from external systems.
- Invoked from Slack or Teams for ChatOps.
After saving, test each invocation path you plan to use (manual run, webhook, scheduled run) to confirm access controls and runtime environment are correct.
Step 6: Explore the Visual Builder for complex flows
Open the Visual Workflow Designer from the Composer to edit the workflow graphically. The designer is intended for building multi-step automation with more control.

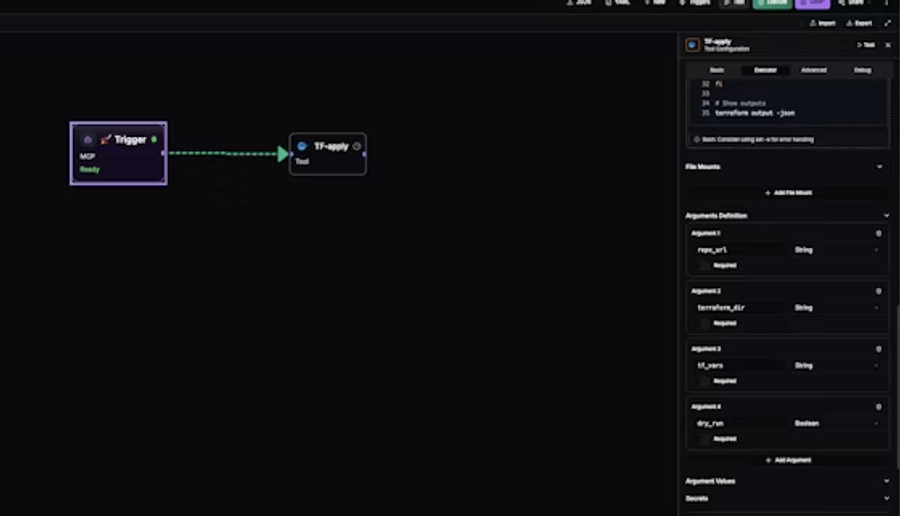
Key designer capabilities to use:
- Pre-built components for common operations (API calls, shell commands, LLM steps).
- Conditional logic nodes for decision branches.
- Parallel execution constructs for concurrent tasks.
- Error handling nodes to define retry and remediation behavior.
Convert the AI-generated plan into a designer graph if you require fine-grained control over branching, input mapping, or step retries.
Result:
Engineers now trigger workflows directly inside Slack, without leaving the chat context. Terraform/Ansible scripts are generated on demand, and DevOps tasks can be queried without logging into Jira or GitHub. This reduces back-and-forth with platform teams, providing self-service DevOps for developers.
Pros
- Delivers strong alignment with production DevOps requirements: Because workflows via Kubiya are auditable, governed, and executed in controlled environments, teams can trust them for infrastructure-level tasks. This is backed by features like deterministic execution and context graphs.
- High security and compliance support: RBAC, policy enforcement, secret management, audit logging, and scopes (workspace-scoped integrations and secrets) ensure that workflows do not become open attack vectors. Official documents show encryption of credentials, least-privilege permissioning, and options for SSO / identity provider integrations.
- Ease of scaling and versioning via Infrastructure as Code: The Terraform provider lets you define agents, integrations, workflows, runners, secrets, etc., as code, version them, drift detect, and deploy consistently across environments or teams. This promotes reproducibility and auditability.
Cons
- Less suited for generic business process automation with little DevOps or infrastructure involvement: Many Kubiya features are heavily oriented toward infrastructure, deployment, observability, and cloud tooling. For teams whose needs are more about marketing, sales, or internal business workflows (e.g. invoices, HR onboarding), the tooling may feel overkill. (Official focus is DevOps context.)
- Requires investment in setup, identity, permissions, runners, and standards: To fully leverage its policy-as-code, secret-scoped execution, deterministic composer, context graph etc., teams must define identity boundaries, set up runners or containers, and integrate their observability system. For smaller teams or projects without mature DevOps practices, this overhead may delay velocity. (Implied in documentation about production readiness and the need for governance.)
- Public pricing and feature roadmaps are less transparent / may require enterprise engagement: The sources often note that some advanced features (policy enforcement, self-hosted options, high scale governance) are part of “enterprise” or require custom contracts. For users evaluating purely on published tiers, this can make cost and feature comparison harder.
2. Zapier
Overview
Zapier remains a leader among workflow automation tools, especially for teams that want to embed AI steps in largely no-code or low-code workflows. In addition to its traditional “Zaps” (trigger + actions), Zapier now offers “AI by Zapier,” AI agents, and integrations with major large language models (LLMs) like ChatGPT and Claude. It aims to let users insert AI tasks, conversational agents, or chatbots into existing workflows without building all the plumbing from scratch.
Key Features
- AI-augmented triggers and actions: Zapier provides specific AI-friendly actions (for example, “Analyze and Return Data” or extracting content from documents and URLs). These capabilities allow workflows to process unstructured data (text, documents, images, URLs) and derive structured insights, rather than just moving data from A to B.
- Integration with many third-party services: Over eight thousand app integrations are supported, including core productivity and business tools (Google, Microsoft, Slack, Airtable, Notion). This wide surface means you can embed AI steps in workflows spanning email, forms, databases, chat, etc.
- Conditional logic, multi-step workflows, and modular design: Zapier supports conditional paths (“if/then” branches), formatting and filtering tools, loops, data tables, and interfaces to build more expressive workflows. Also, newer tools like “AI agents” allow more autonomy in workflows.
- “Prompt engineering” aids and AI-first workflow design: They offer tools to help craft prompts, integrate AI models, and place AI steps sensibly within a workflow. The “AI by Zapier” product is built for users to combine AI models, prompt templates, and logic without building all the infrastructure themselves.
Hands On Creating an Account and Setting Up Your First Zap
Zapier makes it possible to automate workflows without writing code, though developers can extend it further using APIs for custom actions or triggers. To illustrate, let’s use a real marketing scenario.
Let’s take an example, assume you are running inbound campaigns on social media, promoting a landing page with a downloadable case study. Visitors must first submit their business email and details via a Google Form before accessing the PDF. You want every new lead to be automatically captured in a spreadsheet for reporting, pushed to HubSpot for outreach, and stored in your CRM, without manually exporting or importing data. Zapier makes this process seamless.
Step 1: Create a Zapier Account
Go to Zapier’s website and select Sign Up.
Enter your email and password, or sign in with Google or Microsoft.
Verify your account by clicking the confirmation link sent to your inbox.
Step 2: Build Your First Zap
Once logged in, click Make a Zap.
Choose Google Forms as your Trigger App.
- Trigger event: New Form Response.
- Connect Google Forms via OAuth and grant the required permissions.
Add your first Action App: Google Sheets.
- Action event: Create Spreadsheet Row.
- Map form fields like name, company, and email into corresponding columns.
Add your second Action App: HubSpot (for outreach).
- Action event: Create Contact.
- Map the same form fields to HubSpot contact properties.
(Optional) Add a third Action App such as your CRM or email tool, so new leads appear instantly in your sales pipeline.
Save and continue.
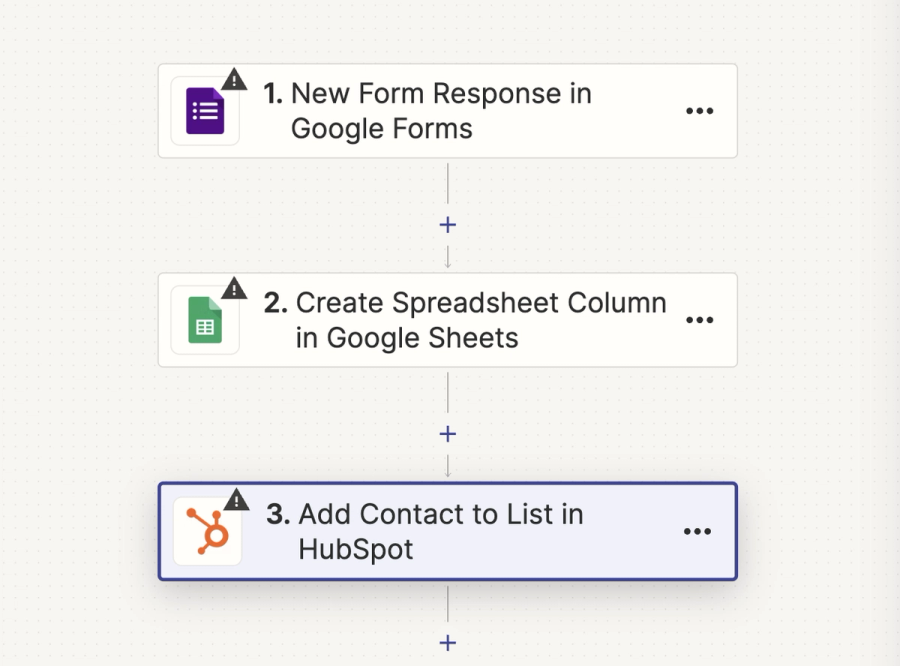
This creates a multi-step workflow: every new Google Form submission automatically flows into Sheets, HubSpot, and your CRM in one pass.
Step 3: Test Your Zap
In the Zap editor, click Test and Review.
Zapier will simulate a new form response, populate your Google Sheet, and create a contact in HubSpot.
If a field doesn’t map correctly, adjust it in the editor and retest until results match expectations.
Step 4: Use Zapier’s AI Copilot (optional)
If you prefer not to configure each step manually, Zapier’s AI Copilot can build the workflow by chatting with you. Simply describe:
“When I send a new message to a specific slack channel, create a card in trello.”
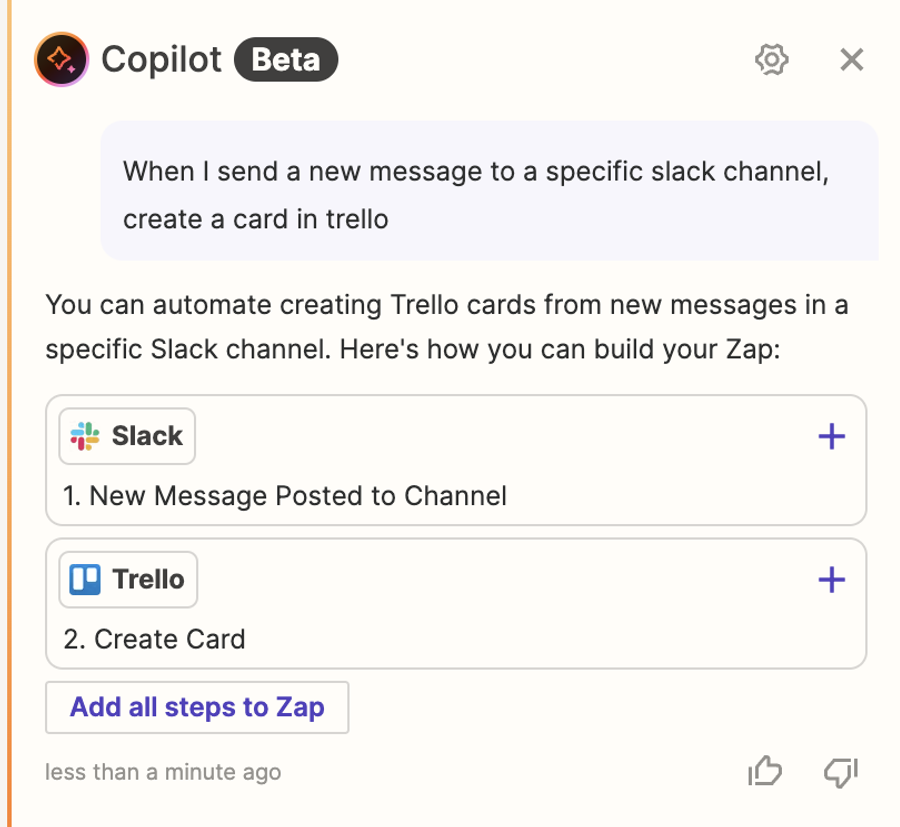
Copilot will draft the Zap, suggest apps, map fields, and create the automation. You can then review, approve, and publish it.
Result:
With this setup, your inbound campaign data pipeline is automated end-to-end. Every form submission updates your Google Sheet, creates a contact in HubSpot, and adds the lead to your CRM, freeing you from repetitive exports and uploads. You can now focus on engaging with prospects rather than manually moving data between tools.
Pros
- Strong breadth: Because of its large app-integration catalog, teams seldom need custom connectors; this accelerates setup.
- Low barrier for mixed workflows: Non-technical users or teams can build workflows with AI steps without writing boilerplate; yet, there is enough depth (conditional logic, advanced pathing) to satisfy technical users.
- Embedded observability and maintenance: Zapier provides decent retry logic, logs, error handling, and versioning of workflows (“Zaps”) so production workflows are more manageable.
Cons
- Cost can scale quickly: As workflows grow (more steps, higher frequency, many triggered workflows), the “task”-based pricing becomes significant. Workflows that are simple at first may become costly at scale.
- Limited depth for highly custom use-cases: For teams that need fine-tuned performance, embedded model training, or very custom agents, Zapier might hit friction; sometimes custom code or self-hosted tooling offers more flexibility.
- Latency / dependency on third-party APIs: Because many steps depend on external integrations, failures or rate limits in upstream services can slow or block workflows; debugging across services becomes more complex.
3. n8n (Flexible AI + Automation Platform)

Overview
n8n is a workflow automation tool built for developers and technical teams who want to combine visual building blocks with code. It supports more than 500 integrations (nodes), pre-built templates, and the ability to self-host or use a managed cloud option. It emphasizes combining AI (large language models, vector stores, agents) with deterministic logic so that workflows are both powerful and predictable.
Key Features
- Visual workflow editor plus code-node flexibility: Every workflow in n8n can be built visually using node-based drag-and-drop; when needed, developers can drop in JavaScript (or use HTTP request nodes) for custom logic. This dual path, no-code for standard flows, code for edge cases, makes it easier to start quickly, but also to optimize for complexity.
- Advanced AI integrations and agents: n8n provides built-in agent support (multi-agent workflows), LangChain integrations, AI-driven data processing (text classification, information extraction), and connectors to LLMs/vector stores. There is a “Self-hosted AI Starter Kit” that bundles n8n with tools like Ollama and Qdrant to run local language models and vector search in workflows.
- Template and tool-node ecosystem: There are many templates ready to use (for example: summarizing documents, chat triggers, integrating with external APIs). Tools (or sub-nodes) let agents call external workflows, execute HTTP requests, or run custom code; this supports modular design and reuse.
- Self-hosting and deployment options; compliance: n8n supports running on your own infrastructure (Docker, cloud VM, etc.), enabling control over data, custom configuration, and performance. For teams that use the hosted cloud option, n8n offers features like OAuth connectors, monitoring for uptime, and version upgrade management. Compliance (SOC 2 etc.) is also a claimed feature.
Hands On Automating Invoice Processing From Email (n8n)
In this example, we will build an n8n workflow that automatically processes rental invoices received by email. Each time a new invoice arrives, the workflow will extract the invoice ID and total amount using ChatGPT, and then record the result in a shared Google Sheet. This ensures tenants always see the latest bills without manually forwarding or updating spreadsheets.
Step 1: Configure the Email Trigger
Open the n8n editor and click Add first step….

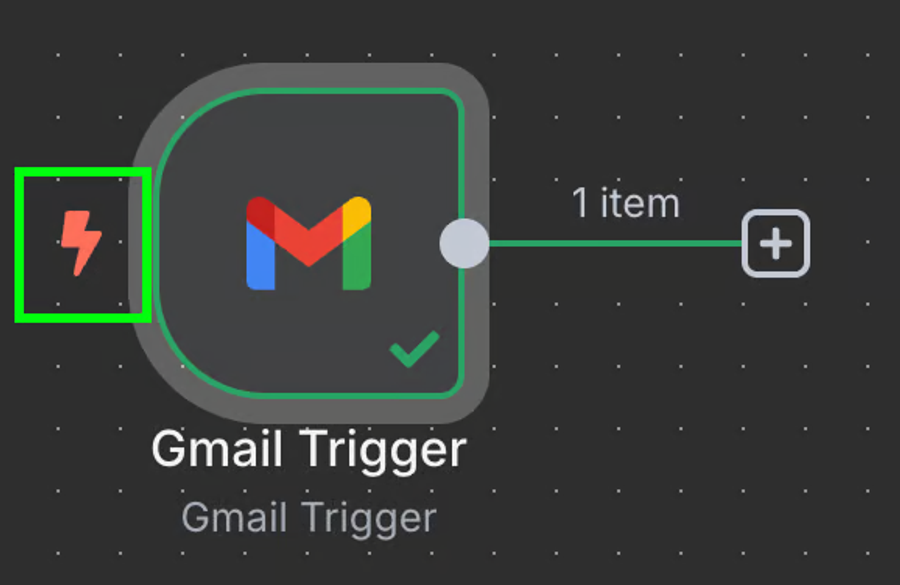
Because it is the first node, it must be a trigger node. Type Gmail in the search box and select the Gmail trigger.
Choose the event On message received. This ensures the workflow runs each time a new email arrives in the designated inbox.
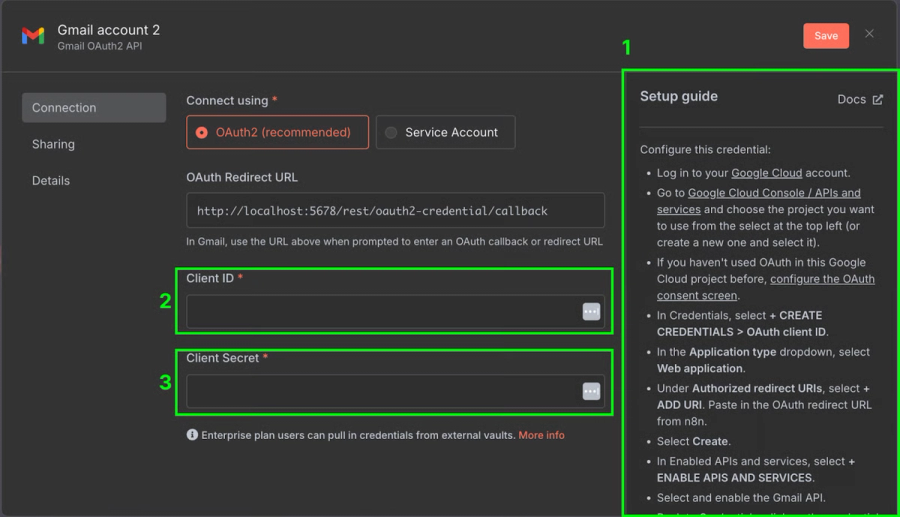
When prompted, create new Gmail credentials. This requires enabling the Gmail API in Google Cloud, creating OAuth credentials, and copying the Client ID and Client Secret into n8n.
Once configured, click Fetch Test Event to validate the connection. The output panel should display the most recent email received.

At this point, our workflow has a single Gmail trigger node. In testing, the snippet field of the email contains the relevant content, for example:
Step 2: Pin the Output for Testing
During setup, it is helpful to “freeze” the Gmail trigger result. Click the pin icon in the node output window. This allows you to repeatedly test downstream nodes using the same email payload, rather than fetching new emails each time. Later, once the workflow is complete, you can unpin the result to resume live operation.

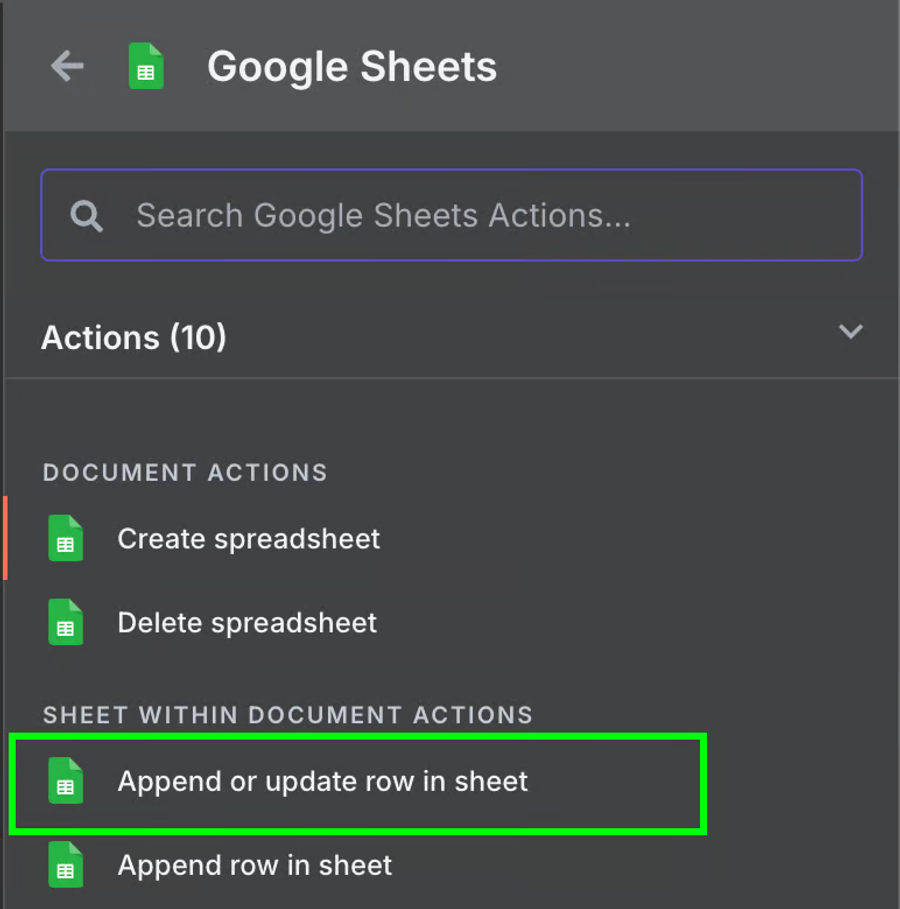
Step 3: Append Results to Google Sheets
Add a Google Sheets node after the ChatGPT node.
Authenticate with Google and choose the shared spreadsheet used with tenants.
Map the extracted fields into columns (e.g. Invoice ID → Column A, Amount → Column B, Date Received → Column C).
Test the workflow again. A new row should appear in the sheet each time a test email is processed.
Step 4: Test with a Sample Invoice Email
That's it! We have a workflow that will automatically process our invoices into a Google Sheet. We can test it by clicking the "Test workflow" at the bottom:
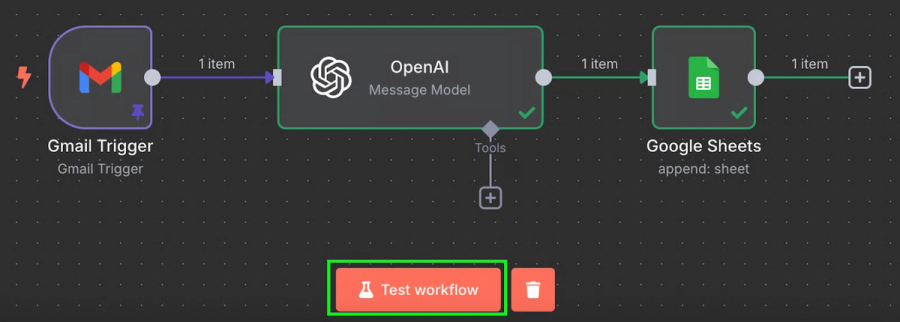
After running it, if we go to our Google Sheet, we'll see a new row with the data:
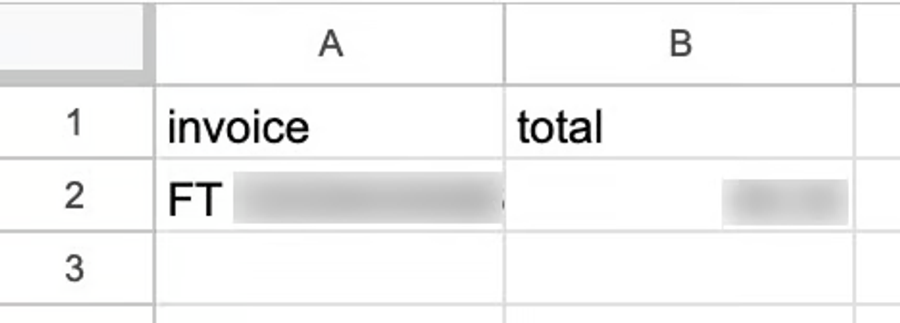
By default, a workflow will run every minute. Depending on the workflow, we should configure an appropriate frequency for it to run. In this specific example, once a minute is far too frequent. Once a day is a more appropriate frequency.
Result:
We now have a fully functional workflow that monitors a Gmail inbox for new invoices, extracts the invoice ID and amount using ChatGPT, and logs each result into a shared Google Sheet. This removes the need to manually forward invoices or update spreadsheets, ensuring all tenants see the latest billing data in real time.
Pros
- Very high flexibility and control for developers: Because you can insert custom code and host yourself, you are not limited by what prebuilt nodes provide. That allows optimizing for performance, privacy, or complexity.
- Predictable pricing structure for cloud plans: n8n charges per execution rather than per task or per action. A complex workflow (many steps) counts as a single execution which keeps cost predictable even when workflows are deep.
- Strong open-source community and extensibility: There is a growing ecosystem of templates, community contributions, as well as tools like the AI Starter Kit that let you build sophisticated workflows locally. This gives more freedom to experiment.
Cons
- Steeper learning curve for non-developers: Users with little coding or API experience may struggle when workflows require custom logic. Debugging errors often involves diving into logs or understanding JSON transformations.
- Hosting, operational overhead when self-hosted: If using the self-hosted version, you must manage infrastructure (servers, backups, security updates). Without strong DevOps support, this can introduce operational risk.
- Pricing pitfalls at scale or unexpected usage patterns: While execution-based pricing is better than per-task for many cases, when many workflows run frequently or have high invocation volume, costs can creep up. Also, some users report surprise around what counts as an “execution.”
4. Make (formerly Integromat)
Overview
Make is a visual-first workflow automation platform that enables users to design complex workflows with branching logic, scheduled triggers, and transformations. It has increasingly added AI-friendly capabilities such as integration with large language models, data parsing, and decision paths based on computed outputs. It is designed for teams that want expressiveness without always writing custom code.
Key Features
- Visual scenario builder with advanced branching: The drag-and-drop “scenario” design tool lets you model workflows that contain conditional logic (“if/else”), loops, routers, and iterators. This enables workflows that don’t follow a linear sequence but adapt to data and state changes.
- Support for AI steps and external model integrations: Make offers built-in connectors to AI services, and HTTP/scoped modules that let you call custom LLMs or AI endpoints. You can, for example, send text to an LLM for summarization or use sentiment analysis in decision branches. It also provides tools to parse and manipulate data (JSON/XML transform, mapping) to feed AI operations.
- High granularity of control over execution: Make allows scheduling workflows, setting throttling limits, executing workflows in precise time windows, and controlling concurrency. This allows developers to optimize for cost, latency, and resource consumption.
- Pre-built templates and reusable modules: There is a library of templates for common tasks (e.g. document summarization, Slack alerts, data sync) and the ability to clone workflows, reuse modules, or segment specific logic into sub-scenarios. This aids consistency and reduces duplication in large teams.
Hands On Automating Personalized Lead Follow-ups with Make
In this example, we will use Make to automatically send a personalized follow-up email within seconds of receiving a new Meta Lead Ad. The workflow collects lead data, enriches it with AI, stores it in a CRM, and sends a tailored response. This ensures no lead is missed and each prospect gets a message that reflects their preferences, all without manual effort.
Step 1: Watch for New Leads from Meta Lead Ads
- In the Make editor, create a new scenario and add the Facebook Lead Ads module.
- Configure it to trigger whenever a new lead form is submitted.
- In a real estate example, fields might include city, postcode, budget, and a free-text field such as “Please describe your dream house.”
- This unstructured text will later be processed by AI to extract useful details.
Step 2: Retrieve Lead Details
- Add a Get Lead Details module.
- This pulls in the complete data from the submitted form, including both answers and field names.
- Storing the field metadata helps keep CRM records clean and improves the quality of personalized responses.

Step 3: Send a Conversion Signal Back to Meta
- Insert the Conversions API module.
- Configure it to send an event confirming that the lead was received.
- This feedback loop improves Meta’s optimization, as the algorithm learns which leads are successfully captured.
- This is particularly important if you are running campaigns with “conversion leads” as a goal.
Step 4: Store the Lead in a CRM
- Add an Airtable (or CRM of choice) module.
- Map lead data into structured fields such as name, email, budget, and preferences.
- This ensures that every new lead is immediately logged and available for reporting and pipeline management.
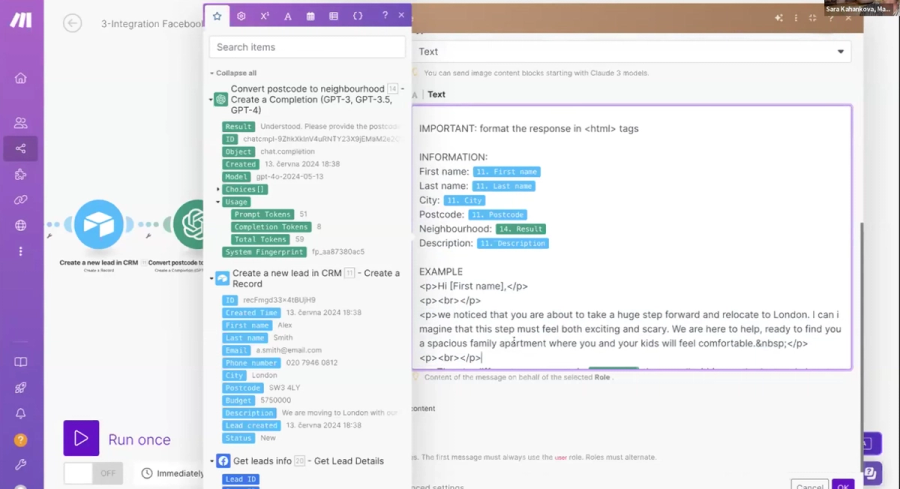
Step 5: Enrich Data with AI
- Add an OpenAI module to handle less human-readable fields.
- For example, convert a postcode like SW6 1AA into “Fulham.”
- This small enhancement makes communications more natural and personal when addressing leads.
Step 6: Generate a Personalized Email with AI
- Add an LLM module (Anthropic, OpenAI, or your preferred model).
- Write a clear, specific prompt that includes:
- Context: “You are a real estate agent.”
- Goal: “Write a short, polite follow-up recommending one property.”
- Lead data: budget, location, preferences.
- Tone example: Include a sample message for style consistency.
- To avoid fabricated details, include an instruction like “Do not make things up.”
Step 7: Send the Email
- Add the Gmail module.
- Populate the recipient’s email address dynamically from the form data.
- Use the AI-generated subject line and body text for the message.
- Send the email immediately so the prospect gets a response within seconds.
Step 8: Update CRM Status
- Update the lead’s record in Airtable with a new status field, such as “Follow-up Sent.”
- This keeps your CRM synchronized and makes it easy to filter for leads awaiting further actions.
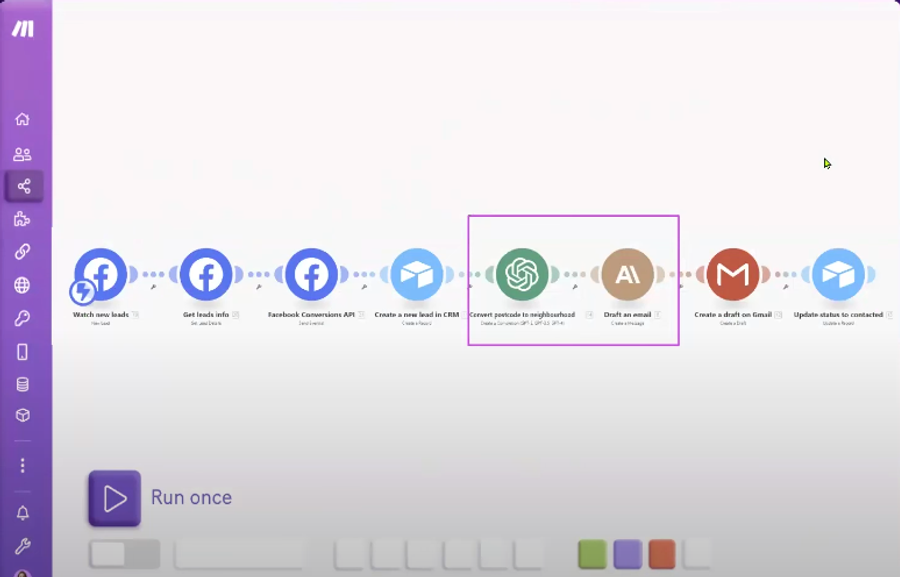
Result
By the end of this workflow, every new Meta Lead Ad submission triggers an automated process that captures the lead instantly, stores it in a CRM, enriches the data for natural communication, generates a personalized email, and sends it to the prospect within seconds.
Pros
- Very expressive visual design, making it easier to model complex workflows without needing full code for every step.
- The ability to integrate with custom AI endpoints or use HTTP modules gives developers freedom to use preferred AI models or host their own.
- Scheduling, throttling, and execution control features help avoid runaway costs or unpredicted resource usage.
Cons
- For deeply custom logic or specific performance constraints, visual tools can become hard to manage: large scenarios with many branches are harder to debug and version.
- Pricing may escalate sharply when many operations, large data transfers, or third-party API calls are involved. Hidden costs (like data transformation or intermediate storage) can accumulate.
- Visual UI sometimes hides complexity: developers may need to inspect data mappings, error propagation, or transformation logic manually when things fail.
Narrative Breakdown
Kubiya stands apart as a specialized tool rather than a generalist platform. Its agent-based orchestration is tightly aligned with DevOps practices, making it a strong fit for organizations already running Kubernetes or Terraform at scale. However, this niche focus limits its appeal for non-infrastructure workflows.
Zapier dominates when the goal is speed and breadth. With more than eight thousand connectors, it is unmatched for integrating common SaaS tools. The trade-off is depth: developers may hit ceilings when needing low-level control, fine-tuned AI handling, or strict governance. Its task-based pricing also becomes painful at scale, especially if workflows fire frequently.
n8n strikes a balance between accessibility and developer power. Its open-source core and self-hosting option appeal to teams with privacy or compliance needs. For AI workflows, integrations with LangChain and vector stores give n8n real flexibility. The learning curve is steeper than Zapier, but for technical teams willing to invest, the extensibility pays off.
Make focuses on visual modeling and is well-suited for workflows that branch or transform large amounts of data. Developers appreciate its granular execution controls, but very complex scenarios can become unwieldy to manage or version. Like Zapier, it is SaaS-only, with a pricing model that counts each operation, which can add up quickly in data-heavy pipelines.
Best Practices for Using AI Workflow Tools
AI workflow tools are only as effective as the practices that guide their use. Poorly designed workflows can create hidden risks, silent failures, runaway costs, or brittle dependencies, while well-structured ones can save hours of manual work. Developers adopting these platforms should start by narrowing scope. Rather than automating an entire pipeline on day one, focus on a single repetitive process that has measurable impact, such as generating daily test reports or automatically tagging new infrastructure resources. This scoped approach provides a safer environment to validate assumptions about cost, reliability, and team adoption.
Observability is another important layer. Unlike static scripts, workflows in platforms like Zapier, n8n, or Make often interact with dozens of external services. Each connection introduces a point of failure. Without proper monitoring, retries, and logging, a failed step can go unnoticed until downstream effects surface in production. Developers should enable built-in logging, configure alerts for failures, and, when possible, pipe workflow metrics into their existing observability stack (such as Prometheus, Grafana, or Datadog). In practice, this means treating workflows with the same rigor as microservices, deploy, monitor, and iterate based on telemetry.
Security should be addressed from the outset. Most workflow tools require storing secrets such as API keys or database credentials. Using a platform’s native secret vault or integrating with external secret managers like HashiCorp Vault reduces the risk of accidental exposure. Teams should also apply the principle of least privilege by granting workflows only the permissions needed for their scope. Finally, governance features such as role-based access control and audit logging should be activated early, even in smaller teams. Skipping this step often leads to an operational backlog that becomes harder to fix as workflows grow in importance.
Conclusion
The four tools compared in this article highlight how different the needs around AI workflows can be. Kubiya is specialized and best suited for DevOps-heavy organizations where agent orchestration across Kubernetes, Terraform, and CI/CD pipelines is a daily reality. Zapier prioritizes speed and accessibility, making it the go-to for quick integration of SaaS applications and lightweight AI use cases, though its pricing and lack of deep control can become constraints at scale. n8n provides developer-level flexibility through self-hosting and extensibility, which makes it attractive for technical teams that want ownership of their automation layer. Make offers a strong visual-first approach for building complex branching workflows, especially when data transformations are at the core of the use case.
Choosing between these platforms is not a matter of finding the single “best” tool, but of aligning the right one with team maturity and budget tolerance. Non-technical stakeholders may find Zapier or Make easier to adopt, while engineering-led organizations will likely benefit more from the control offered by n8n or the agent-driven workflows of Kubiya. What is consistent across all four is the growing role of AI in helping teams handle unstructured data, enrich processes, and reduce repetitive decision-making.
In 2025, industry reports suggest that nearly half of organizations have already adopted AI orchestration to operationalize automation platforms, signaling a shift from static trigger-action workflows toward adaptive orchestration where AI handles error recovery, enrichment, and routing. Teams that adopt early and follow best practices, starting small, ensuring observability, and prioritizing security, will be positioned to integrate AI effectively into their operational fabric without introducing unnecessary risk.
FAQs
1. What is the difference between traditional workflow automation and AI workflow tools?
Traditional workflow tools typically follow rigid “if this, then that” rules. They move structured data between systems but cannot adapt when inputs are unstructured or ambiguous. AI workflow tools extend this model by allowing tasks like document parsing, natural language understanding, or anomaly detection inside the workflow. This makes them useful when data is messy or when steps require interpretation rather than simple matching.
2. Are AI workflow tools safe for handling production data?
Yes, but safety depends heavily on configuration. Most platforms support secure secret storage and role-based access, but the responsibility for safe handling still lies with the development team. For workflows that handle sensitive production data, it is best to use features such as audit logging, integrate with external secret managers, and, where possible, self-host the platform to maintain data residency control.
3. Which tool is best for developers versus non-technical users?
Zapier and Make are generally more approachable for non-technical users thanks to their visual-first design and extensive catalog of prebuilt connectors. In contrast, n8n and Kubiya are better suited for developers. n8n allows deep customization and self-hosting for compliance, while Kubiya is purpose-built for DevOps workflows, making it less accessible for casual automation but more powerful for engineering teams managing infrastructure.
4. Can AI workflow tools fully replace custom integrations?
Not entirely. These tools cover most common use cases and accelerate integration work, but edge cases still arise. For example, a company might rely on an internal service with no prebuilt connector, requiring custom nodes or APIs. In such cases, tools like n8n are advantageous because they allow developers to insert custom JavaScript or Python code directly into the workflow, bridging the gap between packaged automation and bespoke logic.
About the author
Amit Eyal Govrin
Amit oversaw strategic DevOps partnerships at AWS as he repeatedly encountered industry leading DevOps companies struggling with similar pain-points: the Self-Service developer platforms they have created are only as effective as their end user experience. In other words, self-service is not a given.